Another beautiful fall day here, but gradually getting cooler all the time. We had some cute little visitors on our deck today. They didn't stay long as I had no food! Our neighbor fed some last winter so think they are hoping he will do the same this year.
Last week I taught my very first class at our local scrapbook store. Since I had recently gotten one of the envelope boards, I did my class using that great new tool. Mine is the version from We R Memory Keepers. Since this one has come out, Stampin Up has also made them available to their customers. In the class we did 3 file folder type cards and one project making a pocket w/ a tag to use on cards or in scrapbooks. These are another fun way to use the envelope board other than just making envelopes. These projects are inspired by Kathy Orta, Kathy Long and Patty Bennett. Below are my take on their projects.
First was the Staggered Card. There are 2 tabs on the top made w/ double sided cardstock. Paper is My Mind's Eye-Winter Wonderland collection. The snowflakes are cut from dies from Impression Obsession.
This the the Gate Fold style card. It opens in the middle w/ the tabs staggered again so they overlap each other. One side is the blue dot and reverse is gift images. The outside is the dot so panels are applied with the gifts showing. Paper is My Mind's Eye-Winter Wonderland collection. Stamp/Tag is unknown manufacturer.
The third card is a Pocket style with an insert included. The paper is from Authentique from the Festive collection. The music shows "O Christmas Trees" sheet music with the pretty cardinal at one corner. This card will use about 3/4 of a sheet as you use one length for the card and then one corner to cut out the bird section. The die on the front is from Spellbinders Vintage Floral Motifs I think. The greeting on the die cut is from a Papertrey Ink set.
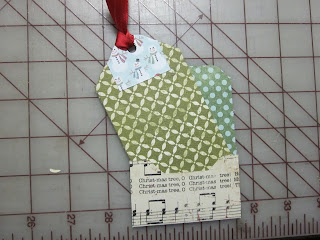
Here is the Pocket w/ Tag. I used scraps from the other cards for this one so the tag & back of the pocket don't really match or co-ordinate :). This could be made any size really to fit your need of a pocket whether it be a card, scrapbook page or other project. The front of the pocket is made separately from the back. The back is inserted & glued on. Then the tag just slips in & out for a message or photo to be seen.
These project ideas were taken from Youtube videos. Check out the videos done by the ladies mentioned above. They are good teachers and make it easy. So hope you will give them a try.
Here are two cards I recently sent. The pink one is a birthday card to a friend I have known for about 25 yrs. It is the swing card which was shown in a previous post. The dot embossing folder is from Stampin Up as is the Framelit die which makes the shapes shown.
The purple one is a get well card using an embossed front w/ the side punched out using the Blossom punch from Stampin Up. The punched out part is on the inside to decorate next to the fold. Silk flowers & sheer ribbon finish it off.
Our verse for today-
James 1:25
"But one who looks intently at the perfect law, the law of liberty, and abides by it, not having become a forgetful hearer but an effectual doer, this man shall be blessed in what he does."
James does not pull any punches and tells it like it is. That is the way God wants us to learn about Him. He does not lie and does not want us to either. God wants a two way relationship with Himself so we must hear the Word and then be a doer of that Word. This is a freeing relationship. May you be blessed from God's Word and from the crafts shown today.


