Hi bloggers,
In the "group" picture of the 3 cards I have a repeat of sorts. The card on the left with the ribbon flower was also posted in the previous blog so you can see the details better. Also it is done in red which makes the details stand out better. Hope that helps to see what actually was done.
Couldn't figure out how to edit after it was published so will have to figure that one out!!
Enjoy your day.
Saturday, February 8, 2014

Snow Days!!
Hi bloggers,
We are having a snow weekend here in the white Pacific Northwest. Right now we have about 10" with snow still falling, but other places have up to 2 feet or more. So this is the time to just stay inside and not worry about getting in the car to go shopping. Snow pictures can be seen on my Facebook page. It's been longer than I would like to post some new project pictures so here we go.

 The top card is similar to the cascade card that i have made before, except it has only one side to multi fold. It started as white card stock, stamped w/ a text stamp and inked edges to give it more color. I then stamped and punched out the flowers from SU Mixed Bunch stamps and leaves from a Martha Steward punch. In the picture, it doesn't look much like it but it does fold up on the slant.
The bottom photo shows a cute little box purse made with the We R Memory Keepers Envelope Punch Board. The little bow in from is also made w/ the punch board. There are videos on youtube to show you how to do these. For the extra little tab on the front I used a small embossing folder to give it some texture.

A couple of friends came over to make cards together and these are the projects I selected to make with them. The one on the left has a Happy Birthday embossed background lightly touched with turquoise ink. A flower was punched out of white using the SU Blossom punch and then stamped with a text stamp. On each petal and in the middle I punched a small hole and then threaded ribbon all around the flower. On top is a die cut of a turquoise flower and a brad added to hold it all together. A loop of the same ribbon was placed under the flower and the whole thing adhered to the card. The ribbon on the flower idea is from Pinterest.
The middle one is a masking technique. Using painter's tape or sticky notes, mask off the card leaving a strip down the middle. Use blue ink of your choice, ink down from the top of the mask. Using green of your choice, ink up from the bottom. Remove masks and then stamp image in black letting some go off the unmasked area. Stamp sentiment at bottom.
The third one is pink card stock embossed w/ hearts. A label shape darker pink card stock is placed toward the bottom w/ a strip of lighter pink embossed card stock on top. Three hearts are die cut and place on to embellish.
 One one of the scrapbooking shows that I watch, the lady was giving away some prizes that she had gotten at the recent CHA. I happened to win one of the stamps. So I needed to send her a thank you card. The pretty lady looking through the window is the stamp I won. The embellishments were made using Spellbinders dies along with some flowers, punched leaves and pearls. Thank you Zandra.
 A friend was in the hospital w/ knee replacement surgery. I didn't know she was going in and so only had a short time to get up to see her before she left and went home. Thankfully I had this card in my stash. It uses the ever popular Blossom punch and dots embossing folder.
 This last card shows off my latest bargain from Joann's Fabrics. They had some Martha Stewart's punches on clearance so I got this lovely set for 75% off. It is called Blooming Vines. The card itself is a slate blue. The punched out vines are of a pearly darker blue w/ a white circle underneath. The label at the bottom is a Spellbinders die cut which has a cobalt & silver ribbon under.
I hope you will try some of these ideas and give them your own twist. If you are in the area, our stamp group will be meeting on Tues., Feb. 18 at 7:00 p.m. in the Wasco County Library meeting room in The Dalles, OR. I will be bringing the demo on 2 or 3 projects. Just let me know and I'll give you a list of what to bring to join in the fun. Hope to see you there. If not, try some of these on your own.
Job 37: 5 God's voice thunders in marvelous ways; he does great things beyond our understanding. 6 He says to the snow, 'Fall on the earth,' and to the rain shower, 'Be a mighty downpour.'
We are seeing God's snow fall on the earth and it is beautiful. The seasons in the northwest truly show the power, grandeur and creativity of God. Enjoy your day whatever kind of weather.
Blessings to you!
We are having a snow weekend here in the white Pacific Northwest. Right now we have about 10" with snow still falling, but other places have up to 2 feet or more. So this is the time to just stay inside and not worry about getting in the car to go shopping. Snow pictures can be seen on my Facebook page. It's been longer than I would like to post some new project pictures so here we go.
The bottom photo shows a cute little box purse made with the We R Memory Keepers Envelope Punch Board. The little bow in from is also made w/ the punch board. There are videos on youtube to show you how to do these. For the extra little tab on the front I used a small embossing folder to give it some texture.
A couple of friends came over to make cards together and these are the projects I selected to make with them. The one on the left has a Happy Birthday embossed background lightly touched with turquoise ink. A flower was punched out of white using the SU Blossom punch and then stamped with a text stamp. On each petal and in the middle I punched a small hole and then threaded ribbon all around the flower. On top is a die cut of a turquoise flower and a brad added to hold it all together. A loop of the same ribbon was placed under the flower and the whole thing adhered to the card. The ribbon on the flower idea is from Pinterest.
The middle one is a masking technique. Using painter's tape or sticky notes, mask off the card leaving a strip down the middle. Use blue ink of your choice, ink down from the top of the mask. Using green of your choice, ink up from the bottom. Remove masks and then stamp image in black letting some go off the unmasked area. Stamp sentiment at bottom.
The third one is pink card stock embossed w/ hearts. A label shape darker pink card stock is placed toward the bottom w/ a strip of lighter pink embossed card stock on top. Three hearts are die cut and place on to embellish.
I hope you will try some of these ideas and give them your own twist. If you are in the area, our stamp group will be meeting on Tues., Feb. 18 at 7:00 p.m. in the Wasco County Library meeting room in The Dalles, OR. I will be bringing the demo on 2 or 3 projects. Just let me know and I'll give you a list of what to bring to join in the fun. Hope to see you there. If not, try some of these on your own.
Job 37: 5 God's voice thunders in marvelous ways; he does great things beyond our understanding. 6 He says to the snow, 'Fall on the earth,' and to the rain shower, 'Be a mighty downpour.'
We are seeing God's snow fall on the earth and it is beautiful. The seasons in the northwest truly show the power, grandeur and creativity of God. Enjoy your day whatever kind of weather.
Blessings to you!
Monday, January 13, 2014
Blessings for a new year.
Hi bloggers,
I hope you had a wonderful CHRISTmas season and safe new year celebrations. It is a busy time of year, but full of meaningful memories and activities. Of course there were the usual mountain of newsletters and cards to send out during this time. But there are other occasions as well. One was my oldest granddaughter who turned 13 (wow how did the time fly!!) on Jan. 1. Pinterest has a multitude of ideas for crafters and I found the ribbon and bow idea so had to try it.
 The flower is Stampin Up's Blossom punch, stamped w/ a text stamp and inked on the edges. On the petals I punched a small diamond shaped punch (could also cut a slit) and threaded ribbon through. On top is a die punched out w/ a brad put in the middle. More ribbon behind in a loop to finish. The background is an embossing folder.


The last two cards were done just by taking some elements that I had on hand and make something useful from them. So take time to just take out some things you might not have used in a while, combine w/ the favorites and see what happens. Enjoy!!
I hope you had a wonderful CHRISTmas season and safe new year celebrations. It is a busy time of year, but full of meaningful memories and activities. Of course there were the usual mountain of newsletters and cards to send out during this time. But there are other occasions as well. One was my oldest granddaughter who turned 13 (wow how did the time fly!!) on Jan. 1. Pinterest has a multitude of ideas for crafters and I found the ribbon and bow idea so had to try it.


These two cards are sympathy cards send to the wife and daughter of a precious man who passed away recently in our community. Both have a stenciled background with decorated paper added. The top one I added white ink to tone down the brightness of the colored paper. The top daisies are a punch w/ green pearls on. The bottom one has the popular SU Blossom punch in green w/ the modern label punched 3 times in tan and criss-crossed on top w/ another medallion punch for the middle. I enlarged the pictures so you could see them better. The tone of the cards is subtle so not as easy to see different elements, but that was the end product I was going for.
The last two cards were done just by taking some elements that I had on hand and make something useful from them. So take time to just take out some things you might not have used in a while, combine w/ the favorites and see what happens. Enjoy!!
* * * * * * * *
"Sing to the LORD a new song, for he has done marvelous things; his right hand and his holy arm have worked salvation for him." Psalm 98:1
God is worthy of our praise as He indeed has done marvelous things and continues to do so. Praise Him in the valleys and on the mountains. He is unchanging and ever-loving. God is good all the time.
Blessings to you all for a wonderful year.
Tuesday, December 24, 2013
December catching up/Merry Christmas
Hi Bloggers,
Been busy the last month or so. As some may know, my hubby had a couple of surgeries which left him in great need of recovery. I had to learn some medical things, being a nurse, etc. We are hoping the upcoming surgery planned for Jan. 7 will help these challenges come to an end.
Hence, there have been no posts showing what I've been making. In between fixing meals, doing extra laundry, changing dressings and lots of etc. I have made a few cards. I would like to show some of them to you and maybe you can try some if you haven't done so already.
 This was a birthday card to my good friend. It is the file folder style with the insert. I glued to scrapbook papers together for the double sided look. For directions on how to make this using the envelope punch board, see videos on YouTube.
 Playing around with a small paper stack that I have. The strip on the right side was made using the camilla embossing folder. The banner was made using the painter's tape technique. Using your ink pad, swipe it across the sticky side of the tape. Then apply it to cardstock. It leaves the shabby look with the ink. Using different colors if you wish, you can make designs of your choice.
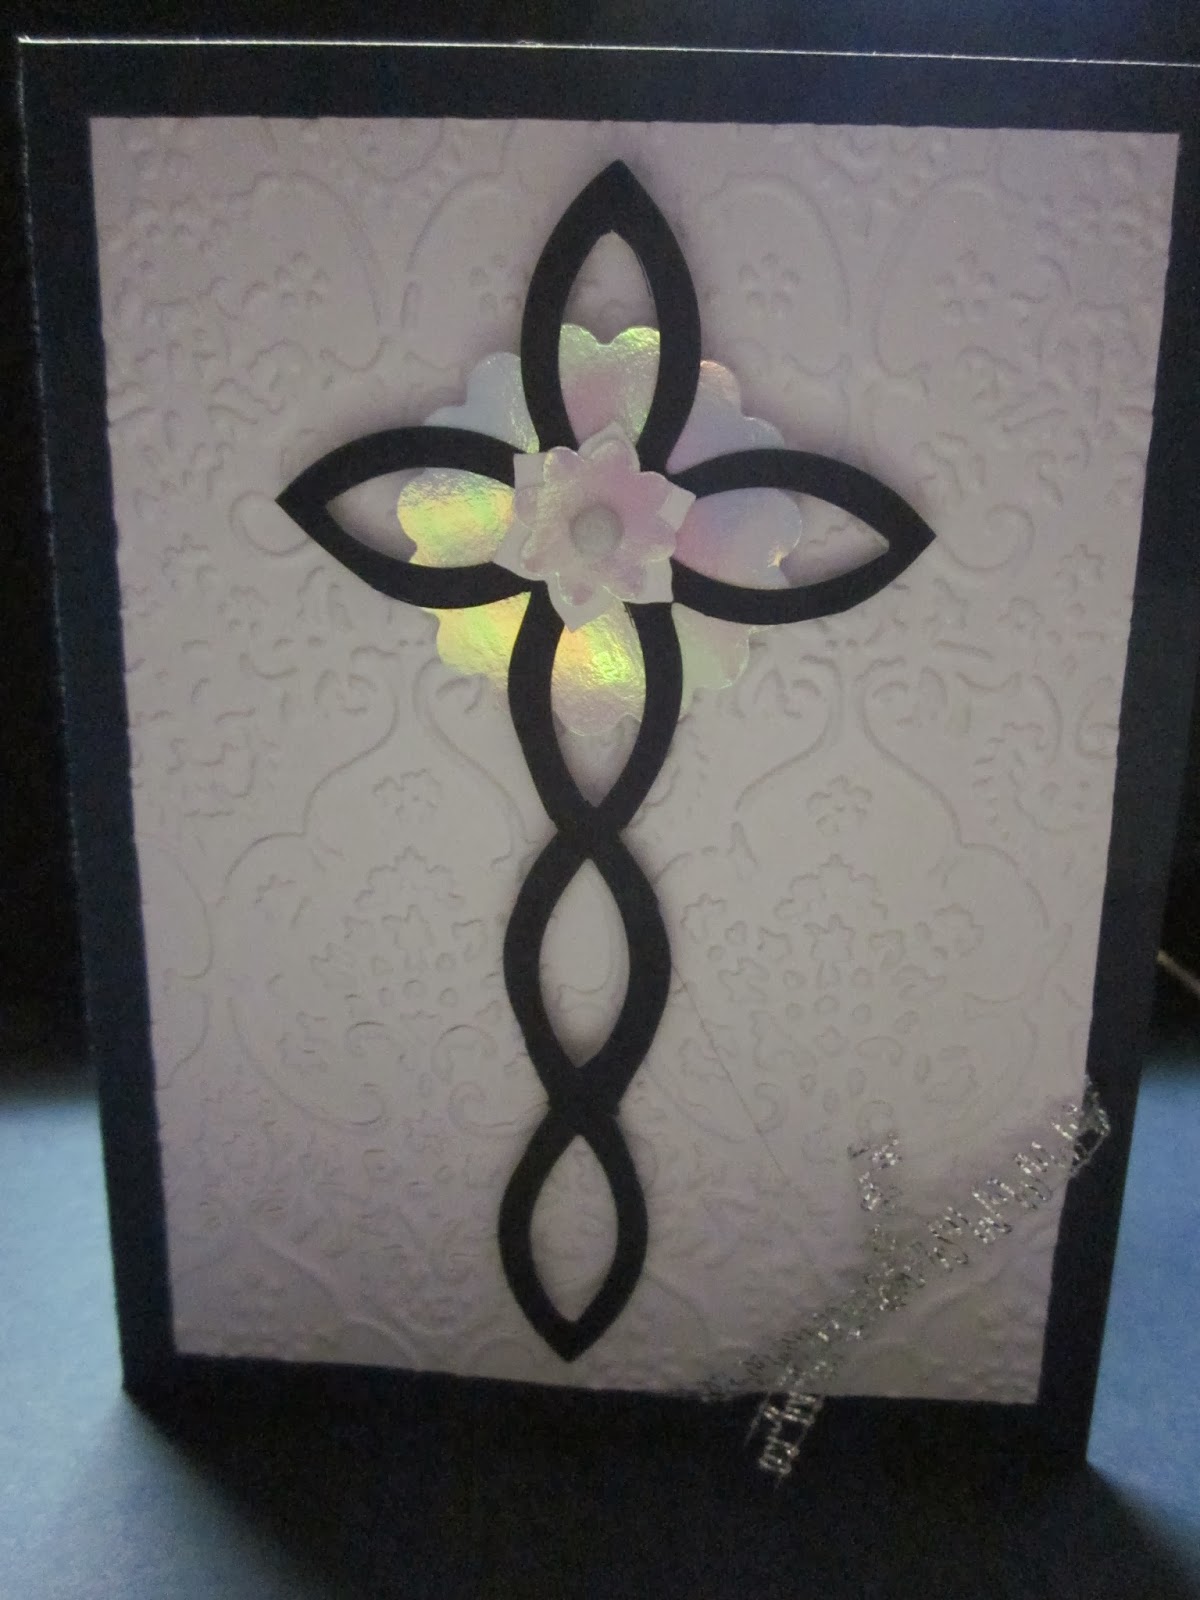
 The background of this card uses an embossing folder, I think it's called textile. The flower parts are punched out of irridescent card stock. The cross is first cut out using the lattice die from Stampin Up. It comes out in a square shape. The cross then is cut away from the square. Some silver lacy ribbon was tied on the corner.
 Watching a Ustream show of Gerriann Armstrong one evening she did this technique on some cards. An area is masked off with painter's tape or sticky notes so only part of the card is showing. This area is then colored by blending ink and stamping into it. I liked the whole stamp of the little girl so took away the mask and then stamped her. A sheer ribbon was added to her skirt.
 I wanted to mail a few cards to someone and the smallest express box from the P.O. was too big. So got out my envelope punch board and a box of Kix cereal and made my own box. Since then, the flap and inside area has been covered with decorated scrapbook paper. To learn how to make a box using the punch board, just do a search on YouTube: envelope punch board box. Should take you to several videos on the subject.
 On a day at a friend's house, we made these 3 cards. The top left card uses the "Pretty as a
Tree" stamp set from Stampin Up. The right one also uses SU stamps, but not sure the name of the set. It is a gate style folded card. An oval was cut from the middle. The same shape for the bird to sit on in the inside. The yellow one uses the same lattice die as the card above with the cross. This time in yellow and the whole design is used. A die was used to cut out the shape, the lattice glued underneath and a piece of vellum under that. Ribbon was tied around at the bottom.

 This is a card that can hold things like money, gift cards or other cards. It uses 1 sheet of 12 x 12" card stock, double sided. It is folded in such a way that it has pockets on the inside and also on the outside back. The Stampin Up edge punch was used to dress up the front fold. Stick on pearls and an embellishment with the cardinal were added along with a ribbon tie to hold it together. Sorry don't have the source for folding directions.
 My third daughter had a birthday in Dec. so she received this card. I had made a similar one and given it to a friend earlier in the year and my daughter had said she wanted one like it. So hope she liked it. The stamping on the right side was embossed w/ hologram embossing powder so it sparkled. The green strip was punched using a fiskars edge punch. The leaves are from a Martha Stewart punch. The flowers are from a Sizzix die.
 One day at a friend's house I made this card. The inside and backing are a gold cardstock. The flourish is stamped. Fairly simple card but o so pretty!!!
 A neighbor gives her kids gift cards so wanted me to make her some holders. This is what i came up with using scrapbook papers glued together, dies, punches and the envelope punch board.

 Next photo shows the inside of them using various stamps, dies and punches. The bottom shows the method I used to hold them together. Since I didn't want to use a glue dot or brad to take up needed room, I punched out stars and leaves to use to bind them together. Since my friend was going to keep the cards on the original card that came from the store,I had to resize the holders to accommodate the larger size.
I hope you enjoyed the photo show and will try maybe a new technique or just revisit one you haven't done in a while. Most ideas come from videos on YouTube and can easily be found in some version. There are a lot of talented people out there who share their talent. Thank them for that.
The angel was speaking to Joseph telling him of what was to happen. His fiance, Mary was to have a baby boy who was conceived by the Holy Spirit. This baby will grow up to be the Savior of mankind. We celebrate this baby's birth at Christmas as the most precious baby ever born. I pray that if you haven't asked Jesus to be your Savior, that you would not put that off. It is the most important event in your life. May you have a blessed Christmas and remember the reason for the season.
Been busy the last month or so. As some may know, my hubby had a couple of surgeries which left him in great need of recovery. I had to learn some medical things, being a nurse, etc. We are hoping the upcoming surgery planned for Jan. 7 will help these challenges come to an end.
Hence, there have been no posts showing what I've been making. In between fixing meals, doing extra laundry, changing dressings and lots of etc. I have made a few cards. I would like to show some of them to you and maybe you can try some if you haven't done so already.




Tree" stamp set from Stampin Up. The right one also uses SU stamps, but not sure the name of the set. It is a gate style folded card. An oval was cut from the middle. The same shape for the bird to sit on in the inside. The yellow one uses the same lattice die as the card above with the cross. This time in yellow and the whole design is used. A die was used to cut out the shape, the lattice glued underneath and a piece of vellum under that. Ribbon was tied around at the bottom.


I hope you enjoyed the photo show and will try maybe a new technique or just revisit one you haven't done in a while. Most ideas come from videos on YouTube and can easily be found in some version. There are a lot of talented people out there who share their talent. Thank them for that.
* * * * * * * * *
Matthew 1:21 "She will give birth to a son, and you are to give him the name Jesus, because he will save his people from their sins."
The angel was speaking to Joseph telling him of what was to happen. His fiance, Mary was to have a baby boy who was conceived by the Holy Spirit. This baby will grow up to be the Savior of mankind. We celebrate this baby's birth at Christmas as the most precious baby ever born. I pray that if you haven't asked Jesus to be your Savior, that you would not put that off. It is the most important event in your life. May you have a blessed Christmas and remember the reason for the season.
Hugs,
MEg :)
Sunday, November 10, 2013
Quails, file folders & such
Hi Bloggers,
Another beautiful fall day here, but gradually getting cooler all the time. We had some cute little visitors on our deck today. They didn't stay long as I had no food! Our neighbor fed some last winter so think they are hoping he will do the same this year.

Last week I taught my very first class at our local scrapbook store. Since I had recently gotten one of the envelope boards, I did my class using that great new tool. Mine is the version from We R Memory Keepers. Since this one has come out, Stampin Up has also made them available to their customers. In the class we did 3 file folder type cards and one project making a pocket w/ a tag to use on cards or in scrapbooks. These are another fun way to use the envelope board other than just making envelopes. These projects are inspired by Kathy Orta, Kathy Long and Patty Bennett. Below are my take on their projects.
 First was the Staggered Card. There are 2 tabs on the top made w/ double sided cardstock. Paper is My Mind's Eye-Winter Wonderland collection. The snowflakes are cut from dies from Impression Obsession.
 This the the Gate Fold style card. It opens in the middle w/ the tabs staggered again so they overlap each other. One side is the blue dot and reverse is gift images. The outside is the dot so panels are applied with the gifts showing. Paper is My Mind's Eye-Winter Wonderland collection. Stamp/Tag is unknown manufacturer.

The third card is a Pocket style with an insert included. The paper is from Authentique from the Festive collection. The music shows "O Christmas Trees" sheet music with the pretty cardinal at one corner. This card will use about 3/4 of a sheet as you use one length for the card and then one corner to cut out the bird section. The die on the front is from Spellbinders Vintage Floral Motifs I think. The greeting on the die cut is from a Papertrey Ink set.
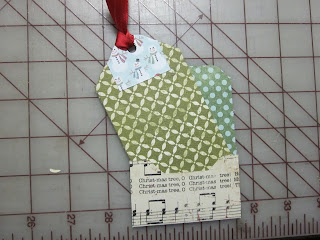 Here is the Pocket w/ Tag. I used scraps from the other cards for this one so the tag & back of the pocket don't really match or co-ordinate :). This could be made any size really to fit your need of a pocket whether it be a card, scrapbook page or other project. The front of the pocket is made separately from the back. The back is inserted & glued on. Then the tag just slips in & out for a message or photo to be seen.
These project ideas were taken from Youtube videos. Check out the videos done by the ladies mentioned above. They are good teachers and make it easy. So hope you will give them a try.


Here are two cards I recently sent. The pink one is a birthday card to a friend I have known for about 25 yrs. It is the swing card which was shown in a previous post. The dot embossing folder is from Stampin Up as is the Framelit die which makes the shapes shown.
The purple one is a get well card using an embossed front w/ the side punched out using the Blossom punch from Stampin Up. The punched out part is on the inside to decorate next to the fold. Silk flowers & sheer ribbon finish it off.
Our verse for today-
James 1:25
"But one who looks intently at the perfect law, the law of liberty, and abides by it, not having become a forgetful hearer but an effectual doer, this man shall be blessed in what he does."
James does not pull any punches and tells it like it is. That is the way God wants us to learn about Him. He does not lie and does not want us to either. God wants a two way relationship with Himself so we must hear the Word and then be a doer of that Word. This is a freeing relationship. May you be blessed from God's Word and from the crafts shown today.
Another beautiful fall day here, but gradually getting cooler all the time. We had some cute little visitors on our deck today. They didn't stay long as I had no food! Our neighbor fed some last winter so think they are hoping he will do the same this year.

Last week I taught my very first class at our local scrapbook store. Since I had recently gotten one of the envelope boards, I did my class using that great new tool. Mine is the version from We R Memory Keepers. Since this one has come out, Stampin Up has also made them available to their customers. In the class we did 3 file folder type cards and one project making a pocket w/ a tag to use on cards or in scrapbooks. These are another fun way to use the envelope board other than just making envelopes. These projects are inspired by Kathy Orta, Kathy Long and Patty Bennett. Below are my take on their projects.


The third card is a Pocket style with an insert included. The paper is from Authentique from the Festive collection. The music shows "O Christmas Trees" sheet music with the pretty cardinal at one corner. This card will use about 3/4 of a sheet as you use one length for the card and then one corner to cut out the bird section. The die on the front is from Spellbinders Vintage Floral Motifs I think. The greeting on the die cut is from a Papertrey Ink set.

These project ideas were taken from Youtube videos. Check out the videos done by the ladies mentioned above. They are good teachers and make it easy. So hope you will give them a try.


Here are two cards I recently sent. The pink one is a birthday card to a friend I have known for about 25 yrs. It is the swing card which was shown in a previous post. The dot embossing folder is from Stampin Up as is the Framelit die which makes the shapes shown.
The purple one is a get well card using an embossed front w/ the side punched out using the Blossom punch from Stampin Up. The punched out part is on the inside to decorate next to the fold. Silk flowers & sheer ribbon finish it off.
Our verse for today-
James 1:25
"But one who looks intently at the perfect law, the law of liberty, and abides by it, not having become a forgetful hearer but an effectual doer, this man shall be blessed in what he does."
James does not pull any punches and tells it like it is. That is the way God wants us to learn about Him. He does not lie and does not want us to either. God wants a two way relationship with Himself so we must hear the Word and then be a doer of that Word. This is a freeing relationship. May you be blessed from God's Word and from the crafts shown today.
Wednesday, October 16, 2013
Group cards again
Hi bloggers,
This week was a double dip into creativity with paper crafts. Monday night was one group of stampers. Tuesday night was the regular stamp club which I've belonged to for almost 20 yrs. It's a good time to get together to see what others are making and get to make some yourself. I even remembered to take a picture of all of them before I gave any away. So here goes.....
 Here are a couple of the paper craft items. The little green guy was made from a cut-out from a Silhouette. (One lady in the group usually brings a project cut from the Silhouette. She is very good at using it.) The little basket is a covered half of envelope. Both contain goodies so guess who gets them? The grandsons of course.
 Shown is the card that I contributed to the group on Monday night. Duplex navy and white cardstock, light gray cardstock, light slate cardstock, Martha Stewart Deco Fan punches and a clear stamp set (manuf. unknown) were used in the making.

This is Tuesday night's creations. We each brought supplies and ingredients to make something. They were distributed at random so we didn't know what we were going to get. It was fun to see what we could do with what we got and also what the other person did with what we brought. You might give this a try in your stamp group. It was the first time we had done this and I think everyone enjoyed it enough to want to do it again.
 These are the cards I made using a Martha Stewart punch (leaf vine I think) and tree stamp from PSX.
Such fun with just a little paper, punches, stamps and ink!! Doesn't take much to make some people happy!! Ha Ha Ha!! But that's very OK!!!
"Blessed is she who has believed that the Lord would fulfill His promises to her!" Luke 1:45
We know that He will never go back on His promises, and there are a lot of them in the Bible. God never changes and is true to His word for eternity. Praise the name of the Lord!!
Blessings to you and yours,
This week was a double dip into creativity with paper crafts. Monday night was one group of stampers. Tuesday night was the regular stamp club which I've belonged to for almost 20 yrs. It's a good time to get together to see what others are making and get to make some yourself. I even remembered to take a picture of all of them before I gave any away. So here goes.....
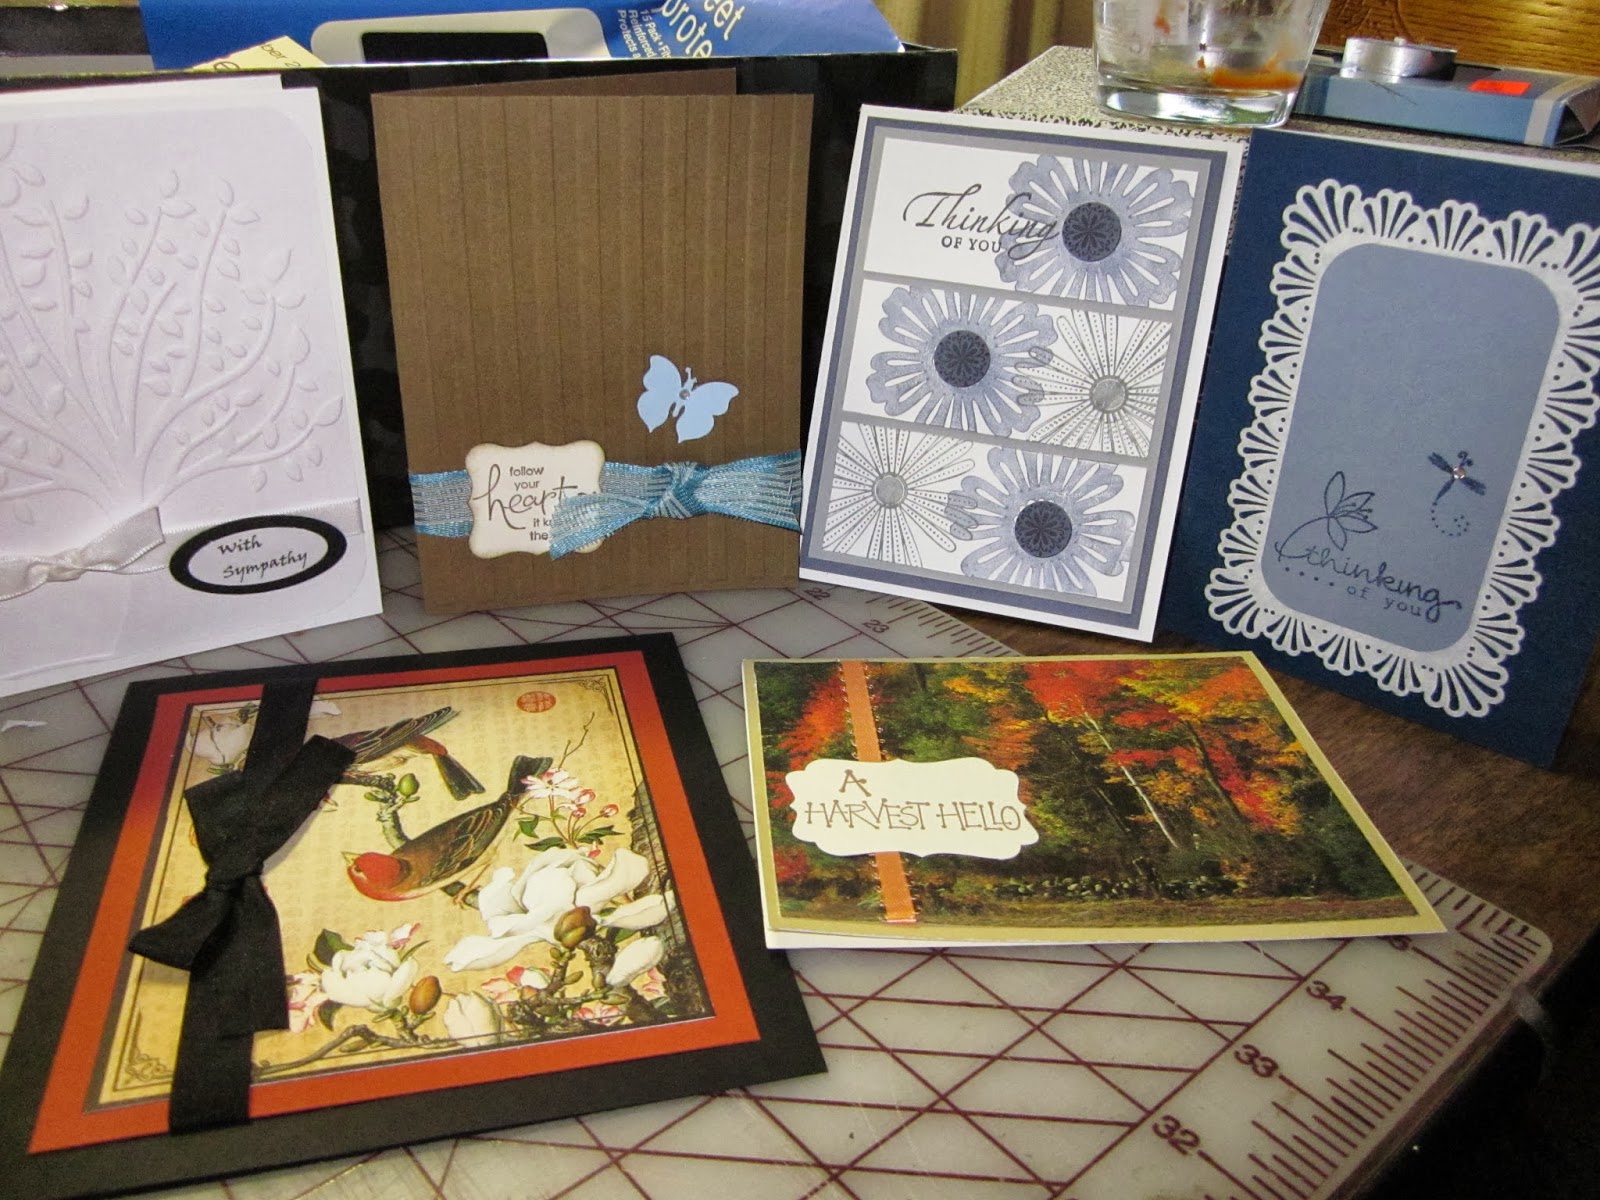


This is Tuesday night's creations. We each brought supplies and ingredients to make something. They were distributed at random so we didn't know what we were going to get. It was fun to see what we could do with what we got and also what the other person did with what we brought. You might give this a try in your stamp group. It was the first time we had done this and I think everyone enjoyed it enough to want to do it again.

Such fun with just a little paper, punches, stamps and ink!! Doesn't take much to make some people happy!! Ha Ha Ha!! But that's very OK!!!
"Blessed is she who has believed that the Lord would fulfill His promises to her!" Luke 1:45
We know that He will never go back on His promises, and there are a lot of them in the Bible. God never changes and is true to His word for eternity. Praise the name of the Lord!!
Blessings to you and yours,
Tuesday, October 8, 2013
Birthday cards
Hi bloggers,
Last weekend was the time for birthdays. So cards need to be made. One for 4 year old grandson, one for 6 year old girl in our church and one for son in law. Hopefully will be able to get them uploaded so you can see them. The twist flip card is not new to this blog, but colors are a bit different. As is the swing card. Also file folder card done in a slightly different way. All fun to make. Hope you enjoy.


 Swing card was made using Stampin Up framelit die. Twist card used 2 Martha Stewart punches. File folder card used 2 Stampin Up punches, 1 Martha Stewart punch and corner scissors unknown manufacturer.
Give these techniques a try if you haven't already.
Last weekend was the time for birthdays. So cards need to be made. One for 4 year old grandson, one for 6 year old girl in our church and one for son in law. Hopefully will be able to get them uploaded so you can see them. The twist flip card is not new to this blog, but colors are a bit different. As is the swing card. Also file folder card done in a slightly different way. All fun to make. Hope you enjoy.


Give these techniques a try if you haven't already.
-
John 1:16 NIV
"From the fullness of his grace we have all received one blessing after another."Isn't that the truth? God just keeps blessing us from His love for His children. Thank Him for His blessings to you today.Wishing you blessings from His riches.
Subscribe to:
Posts (Atom)