Tuesday, August 30, 2016

Fall is on the way!!

So then you are no longer strangers and aliens, but you are fellow citizens with the saints and members of the household of God,
Ephesians 2:19 ESV

Those who are believers in the Gospel can be assured of a home beyond this one on earth and death. We are the children of God and heirs to His inheritance. God is blessing us with that assurance while we are on earth and yet again when we reach heaven when in His presence. We have a lot to look forward to!! (Also look this verse up in the Message for an expanded version of this great verse.)

Now on to the craft portion of this post. It's been a while since I've posted so will give an abbreviated version of things I've done.

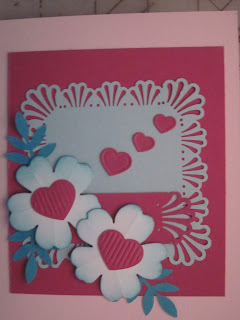
This card is for a 20th aniversary. Hearts are from SU Hearts a flutter stamp set and Butterfly Basics.
 
These 2 cards are the male and female versions of the bike card using Close to my Heart stamps.


This card shows the CTMH Paper Garden stamp set using different colors.


 This is an anniversary card using the SU Bird Builder punch. Above is the scalloped edge punch.

Here I used the owl punch to make the tulips. All the pieces were added except the sentiment area and then the card was embossed.

I needed a different lady's birthday card so used this set from CTMH-A happy hello. It turned out very cheery with all the different colors used.
 This is a birthday card requested by a friend to give to her friend. it is mostly done using punches. The middle of the ladybug was made using a scalloped die.

 SU Mosaic Madness stamps and punch was used for the main feature on this card. Under the main strip is the scalloped edge punch. Embossing was done using the Mosaic embossing folder by SU.
 
SU Flower Garden and pansy punch were used to make the main part of the card in 2 different colors. One of the butterflies from Butterfly Basics was used for the embellishment. A deep edge punch from Martha Stewart was used for embellishment on the side.

Here is embossing on 2 different  pieces, labels in 2 different sizes and a butterfly die cut in the middle.

If you have stencils that you haven't used in a while, time to get them out. The background of this is done with a stencil; stamping on the top with decorated paper on the bottom to coordinate. A  little ribbon at the top ties it all together.

 Both of these techniques are found on Pinterest as are most of the cards done here. The top uses 5 punched out butterflies that are glued together just on the edges to make an accordian fold. The bottom shows 3 different color banners and the whole card is then embossed with the happy birthday embossing folder. it is then topped with small butterflies and a label with "celebrate" die cut glued on.

I hope you have enjoyed seeing what I have done. Give some of them a try if you haven't already. Most are from Pinterest or have the inspiration from cards seen there.

Blessings to you and yours.

Saturday, March 26, 2016

Happy Easter 2016

Greetings on this Resurrection weekend as we celebrate the rising of the Lord.

John 3:16-18The Message (MSG)

16-18 “This is how much God loved the world: He gave his Son, his one and only Son. And this is why: so that no one need be destroyed; by believing in him, anyone can have a whole and lasting life. God didn’t go to all the trouble of sending his Son merely to point an accusing finger, telling the world how bad it was. He came to help, to put the world right again. Anyone who trusts in him is acquitted; anyone who refuses to trust him has long since been under the death sentence without knowing it. And why? Because of that person’s failure to believe in the one-of-a-kind Son of God when introduced to him.
This is what and why we celebrate the occasion of Easter. Jesus came to live and die for all of mankind's errors/sins. He loves us so much that He endured one of the most horrific of deaths so that we might live forever with Him.

This is the card I sent to my kids for easter this year. The stamp is from Close to my Heart-Rejoice. The oval and scalloped oval dies are from Lifestyle Crafts and the embossing folder is Swirly from Stampin Up.

I pray you have a wonderful and blessed Easter and that the Lord blesses you at this special time of year.

Many blessings,
Meg

Monday, February 1, 2016

retro sketches #200

This is for the #200 challenge on the retro sketches blog.

Here is the original sketch from the blog:retrosketches.blogspot.com


Mojo Monday 433

These are my entries in this week's sketch challenge. Mojo Monday #433


Wednesday, December 9, 2015

Blessings of the season Part 2

Since there were too many potential pictures to post, I thought it needed to be broken up a bit. We will continue on our card journey.
These two cards were made at a friend's house so do not know the sources.


Here again is the SU Bird punch. I also used a small flower punch of unknown source.

This card was partially embossed and the embellishments. Flat laces were applied around the edges. Hearts were cut from SU's Hearts a Flutter dies and then embossed.


These stamps are from Close to My Heart Paper Garden set.

This card is a collage card of various papers. The one in the middle has been sewn on using a sewing machine zig zag. Some flat lace is glued at the bottom as are some buttons and a sentiment.


 Here again is the Paper Garden stamp set using some different colors.

A friend of mine likes Betty Boop so for her birthday I made this card using SU's Top Note die (now retired). The idea came from Pinterest. The rest of the elements are mostly die cuts and punches.

Stampin Up has a new embossing folder: Woodlands. It is fun to use as you can make it seem there are things behind the trees: could be a vehicle, other trees or in this case the mountains in the distance.

Again from Pinterest is an idea using the Mixed Bunch stamp and the Blossom punch from SU. Just stamp the flower a few times. Punch out 2 white Blossom punches. Stamp out a center.  Adhere all together and put on a matching card base.

Here is an example of a type of iris folding w/o the iris. This is just strips of cardstock behind a cutout heart that had been cut from textured card stock. I turned over the hart and then stamped a greeting on it.
I had this turned the right way up but for some reason, it wouldn't come out that way. Anyway this was a fun card to make. It is done with emboss resist. I hadn't done this technique in a while so decided to try it again. First thing is to stamp the "weeds" in versamark ink and then emboss with white embossing powder. I highlighted the flower part using Frayed Burlap Distress Ink. Then I sponged Salty Ocean Distress Ink and Marvy Turquoise ink all over the card. The text is the turquoise ink stamped a few times. A strip of burlap paper is toward the bottom with a strip of flat lace glued on with a single branch glued under. Two textured die cut butterflies are glued on to the strip of burlap and lace. The idea for this is from Pinerest as are a lot of these cards.

I hope you have enjoyed seeing what I've done over the last few months. I haven't put all my cards up or my other projects. There are still some items to be done before Christmas plus finish my big list of Christmas cards. So I had better get to my list of "elf" duties. Wishing you all a wonderful Christmas season with all the glory and awe that it involves. Blessings to you!!


Blessings of the season

Isaiah 9:6 For to us a child is born, to us a son is given; and the government shall be upon his shoulder, and his name shall be called Wonderful Counselor, Mighty God, Everlasting Father, Prince of Peace.
This is the One who we celebrate this season. His coming changed the world and its people forever. A simple faith in the Son of God as your personal Savior can change you and your world. He wants to come into your life and have an ongoing relationship with you so that you can have the life abundant and life eternal with Him. Celebrate the Prince of Peace!

Since I seem to have taken almost half a year off from blogging, it really is time to catch up once again. This is a busy time of year but you can always bookmark this issue and then come back after all the festivities have past, relax with a cuppa and sort through some card ideas.


This stamp set is from Close to My Heart, Typed Note and includes the typewriter and some messages. The punch at the edge is from stampin up but think it is retired.


This cute bear is made using die cuts and punches. It can be found on Pinterest.


 This simple card has an embossed background using Mosaic Madness embossing folder from Stampin Up and two different spellbinder dies. The one with the white paper was cut partially to give it a tag like effect.
The feathers on this card are from a feather stamp set from Close to My Heart and I just cut them out. The burlap is from a paper pad and the edging is an edge punch from Martha Stewart.

Once again I used the We Are Memory Keepers Envelope Punch and made this card using double sided paper. The medalion on the front is made with a Martha Stewart punch as is the edging at the bottom.

 The die cut here is from SU's Butterfly Basics set. Don't know the embossing folder used. I think the designer paper is also SU. I made this at a friend's house so don't know the sources.

This is another embossed card but it had been stamped on first. The hearts are sparkly paper die cuts.
This was a fun way to use die cuts. Just split one die cut into two and add embellishments. The heart was a die cut also and then put through an embossing folder.

 The embossing folder used for this card is Elegant Lines from SU. Some designer paper was glued down first onto the card base. The Blossom punch was used on the right side to allow the paper to show through. Additional die cuts/punches were used to decorate.
A variety of punches were used to make the flower and then die cut hearts. The edge is made with a Martha Stewart punch.

Masking is the technique used here. Mask off a strip in the middle of the card and sponge on desired inks. Remove masking, ink up stamp and stamp images. 

This cute bird was made using SU's Bird punch. Just punch out in various color card stocks.


This card was made using SU's Butterfly Basics stamp set. The die cut is one that goes with that stamp set.

Stay tuned for Part 2


Thursday, July 30, 2015

Oops I found the "lost" blog.

 It was a case of mistaken identity. The blog was supposedly lost. But look again and you will see the sign in information was where it went wrong. It helps to use the correct information to get where you want on the internet. So note to self: be sure to check information to make sure it is correct for what I want to do. Nuff said on that subject. Hence, there has been a huge delay to update this blog. Really is was a bit of that mistake on my part and a bit of just plain procrastination.

There have been quite a few cards made so have a lot to share.
  The first card is a fun one to give to kids as it is so colorful. Different sized and colored circles are glue to a background and then texturized with an embossing folder. A banner was added for a little more interest.

 This card combines a pre printed panel with other easily created elements. Lilac and tan panels are layered under a scallop circle w/ a white circle and the sentiment stamped on. A Stampin Up Pansy punch and Petite Petals punch create the flower. A strip of burlap and ribbon finish it off.


 This card has an interesting opening. I used Spellbinders labels in 4 different sizes. The card base is in the shape of the largest die. The front has layers of the various sizes. The technique to making this card is from Dawn Griffith's blog: dawnsstampingthoughts.net. I just used a different set of dies but the technique is the same. the Mr. and Mrs. card can be found on her blog.